And now for the ugly pictures.
Where do I begin? I think I'll just let the "before" pictures speak for themselves.
There's the dining room. Wow. Help needed.
Last fall we lived like this from October through till' Christmas. I cooked with the stove in the middle of the kitchen for the first half of that time period. Once the stove was back in its spot the new dishwasher (not yet hooked up) took its place in the centre of the kitchen for several weeks.
Wow, so glad I was at work during this time-- I would have gone absolutely crazy if I was at home all day in this mess. Instead I had to come home to this at the end of a long day of work and try to cook dinner (then clean it up)-- it only drove me partially insane-- not completely crazy. At least the shop vac came in handy for cleaning up Caleb's meal time spills.
Here's the dining room-- in progress. The flooring is in... finishing is still to come (as you can see from the opening leading into the dining room). Poor little Caleb. I didn't like eating breakfast in that crazy room either.
As I've mentioned before in a previous post, my kitchen has not really been renovated-- it's received more of a minor (cheap!) facelift with paint and new curtains. The flooring and baseboards were replaced in these two rooms (along with the rest of the main floor of our house)-- but other than that, it's just paint and a few new accessories in this kitchen!
Here's the dining room now.
It's really a pretty basic room-- just some new curtains, artwork on the wall and our table and chairs! Oh, and this beautiful bowl. Thank you Ikea.
Wish I could have showed you the "before" picture of the carpet in here before Doug ripped it out. You probably wouldn't want to see it. Kids and carpet in dining rooms DO NOT go together.
These chairs are remarkably comfortable. The selling feature for us was the fact that they're stackable! If you knew how many times Doug and I have moved since we've been married you'd understand how excited were were about this. Our table is getting pretty beat up-- I'm hoping Doug will make me a new one. Someday.
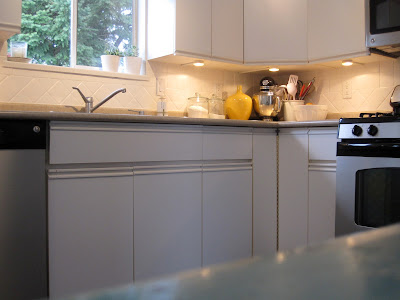
And, here's the kitchen. It definitely still needs major work. We're planning to rip out the bulkhead, replace/resurface the cabinets and put in a new countertop. When? Who knows. But let me tell you-- my cabinet building husband has plans.
Here's one side...
And the other side!
The first thing I did was paint out the oak trim on the doors and drawers.
It probably only took me an hour to do, but it made a huge difference.
The next thing I did was paint out the multicolored tile backsplash. I learnt this trick from my Mom. When I was a kid we moved into a tiny (and ugly) temporary house while we were building our new one. The kitchen and bathroom were covered in ugly tile straight from the 70's. We sanded, primed, and painted it all out in white and it looked fantastic. I did the same in my kitchen. The key is to use an oil based paint since you want it to stand up against all kinds of abuse. My backsplash paint job is now 2 years old and it still looks great.
The kitchen did have one great thing going on when we moved in-- under cabinet lighting! Love it.
And here are a few other details.
This desk I found at MCC for a mere $15 bucks. It's beat up, distressed, and blue-- I love it. It gives me a bit of extra storage in this kitchen and it's a great place to store/hide the paperwork and junk that seems to collect in kitchens. Plus it has a built in cubby for diaper bags. One day this wall will be pantry cupboards, until then, the blue desk will do.
We put up these shelves above the desk-- these ikea shelves were left in the dining room by the previous owners. They were the beech color-- so I painted them, picked up the Ikea brackets for extra support and had Doug mount them on the wall.
Other cheap accessories-- cookbooks, and a picture I took in Montreal a few years ago. Oh look-- there's Santa :) Caleb played with Santa (the eraser) for half and hour this morning. In a house full of new toys he chooses the Santa eraser. Go figure.
More free art. A friend of mine picked up a bunch of old antique picture frames for a project she's working on in her house. This picture was in one of the frames-- she was going to get rid of it... so I snagged it :) It looks cute in my kitchen.
Other kitchen accessories-- kids with bed head and pajamas.
Caleb was my picture-taking assistant this morning (when he wasn't playing with Santa eraser).
There's even a table for all those bed head/pajama kids in my kitchen.
After painting everything in white-- the room needed a bit of color. So, I made some cute little roman shades for the two windows. They were so cheap and so easy to make. All it took was 2 yards of fabric for both (1 yard per curtain-- you can order it here) some broad cloth to line the back, a bit of velcro and some scraps of wood stolen from the garage. I also made one for the bathroom (see here).
And that's the kitchen. Time to grab my coffee and relax for a bit while the kids are still napping :)


14 comments:
You are so inspiring and I adore your blog. ADORE it. I look forward to every post.
I agree - you are inspirational! You should be a home decorator! Love the new kitchen - well done!
Hey! I've been scrounging around on the internet for an easy roman blind pattern. I'm making blinds for the Studio and want to foam back them for additional sound proofing and I figured a roman blind would be the way to go. I found some really cool fabric on those sites you posted a while back... do you think you could send me the instructions on how you made those blinds?
Cheers,
Erin the girl :)
Another great make-over post!
I love love love your make-over posts. You've got such a knack for the detail things that pull rooms together - so fun!
I have a question about painting tile (because in revealing your renovating skills, clearly you are advertising yourself as some sort of diy guru!) You mentioned that you had tile in the bathroom in an old house - did this include in the shower? We have some terrible brown tile in our bathroom that isn't going anywhere soon - but it's tub to ceiling tile in the shower. Figure we could sand/paint this, or would the constant water on it be a problem?
Thanks :)
-long time blog stalker & sis-in-law to Rebekah
Thanks everyone for your lovely comments :) Erin, I would be more than happy to send you the roman shade making instructions-- or maybe I'll just put them up on the blog! Sabrina, we didn't need to paint the tile in the shower in our old house, but my bro and sis in law (Jamie) painted out two tile surrounds in their place-- it can be done!! They did a really thorough job of sanding and used a heavy duty primer. I'll see if I can get the info on the products they used!
Ever thought of taking up photography?
Stunning, as usual.
Loving the blue desk. LOVE it.
And the little piece of art that you got from your friend is actually a real place in Venice. We've been there. :) Pretty cute addition to your shelving, I must say.
You amaze me once again.
Interior Design Elissa... I'm tellin' ya.... interior design. You'll make a fortune ;)
Looks great! I would also love to have your roman shade instructions. I've just taken up sewing again and my windows desperately need new treatment! Tutorial please:)
I too am amazed at all our Kaleb can do and accomplish. Getting dressed is still a bit of a mystery for him too. Maybe it's a different side of the brain thing...lol!
Love your "refreshed" kitchen! Great touches of Ikea and white dishes and pitchers... We have been living in the same house for 25 years and have redone so many things! We call our kids "Reno babies". There always seemed to be a project going on. Our Reno babies are now grown and gone..Last year at this time we were redoing our kitchen.... it was worth the wait...I love it!
Hello, I am completely new at this blog thing, but a friend sent me a link because we have the exact same cupboards in our home and she (and I) think a facelife is in order...but we are on a very limited budget. I am not a painter either, so could you just give me a bit of a 101 on what to do to paint them. Do you paint the whole cupboard or just the "handles"? Do you need to sand them?
Thanks, they look great.
absolutely gorgeous! thank you for sharing!
Gorgeous! It is so modern and clean looking. I’m really impressed.
Wholesale Furniture Denver
Kitchen Cabinets Parker
That's a very lovely kitchen you have there. The floor, the furniture, and the wall matched perfectly.
Kitchen Cabinet Santa Fe
Home Kitchen Remodeling
Post a Comment