Showing posts with label our office. Show all posts

Wednesday, November 09, 2011

Room by Room

I'm tackling the basement.  Room by room.  After months of being an invalid I'm finally a slightly more able bodied person.  And after months of neglecting all proper methods of organization my house was becoming a bit of a disaster zone.

Las week was the office.


I have the most fabulous built in bookcases ever-- made by my fantastically amazing husband.  And in case you didn't know-- these bookcases are actually Ikea's Billy bookcases that we customized for our  office.  (You can read more about the projects we've tackled in the office here).


But after months of neglect the office was terribly disorganized-- and my bookcases were looking terrible too.  So I took everything off the shelves, sorted through the mounds of paper work, office supplies, and sewing paraphernalia and then put it all back together.

I rearranged the shelves a bit and am liking the way they look.


And I finally took my metal Superstore bins back from Caleb.  His little stuffed animals did look pretty cute in their cages, but I'm excited to finally have a place to stash my fabric...


And... speaking of Billy bookcase hacks-- did you see the one's Centsational Girl completed last week?  They look pretty sweet!  I'm liking the way she painted the back of the bookcases blue... although I do like the look bead board we used to update the bookcases in our office.

{read more about her bookcases here}

It's soooo nice to have my office/sewing room organized again... kinda makes me feel like doing a little sewing :)

Tuesday, June 14, 2011

It's a pinch

I started this project at Christmas.  I'm so behind... I can't believe I'm only finishing it now!  But while I was at home over Christmas my Mom taught me how to make pinch pleated curtains.  I love a good window treatment... and I think pinch pleats are the bomb.  I found this fabric at fabric.com for a steal of a deal... like $6.00 a yard or something crazy like that and thought that it would make great curtains.  I can't find it on fabric.com anymore-- it must be sold out... but I found it here for $23.99 a yard.  I like my deal better :)


So I made my curtains over Christmas with my mother's guidance and brought them home in my suitcase.  And then I got lazy, and they sat in the office waiting to be ironed, hemmed, and hung!  All of a sudden-- over the past few months-- I started noticing this fabric pop up here and there...


Apparently there are other people out there who like the same things I do... kind of reassuring :)  Well after many many months of procrastination, I finally hung the curtains!  Here they are...


Even though we have a smallish basement window in our office, I decided to hang floor to ceiling drapes to make the room feel more like an upstairs room... it makes the window seem grander and more important.  I was a bit worried about how they would hang, since there is a bit of a ledge half way up the wall, but Doug stretched the brackets out as far as the could go and you can't even notice the built out half wall.

For those of you who don't know what pinch pleats are, here's a close up.  You basically sew heading tape into the top,calculate how many pleats you want and how far apart they need to be (Doug's mad math skills sure came in handy for this step!) sew up your pleats, and insert metal hooks into the back of each pleat.  When it comes time to put them up, you place the hooks into metal rings that are attached to the curtain rod.  As you can imagine, making these kind of drapes are time consuming.  There's a lot of handiwork involved in creating them... which is why they are so expensive to buy!  So it was definitely more affordable for me to make them myself.


I love the look of drapes that "kiss" the floor.  And yes, I do realize that my floor length drapes hang over my baseboard heater.  I only turn it on occasionally on colder days when I work in the room, so I figured I can pick this panel up off the floor when I decide to turn it on.  Don't worry people!!


I'm loving the way the office feels with the new curtains.  There's something so great about cheerful curtains... they really make a room feel fun and bright... even a basement room!!


I ordered 6 yards of the fabric and only ended up using 5 to make these curtains... what to do with the remaining fabric... can anyone say throw pillows?

Friday, April 01, 2011

If you want to DIY yourself some built-in's... do it this weekend!

So I noticed on Ikea's site that Billy bookcases are on sale this weekend only!!  Instead of $69 bucks for one shelving unit, they are selling them for $49 each (black and white only).  I think they were cheaper for a one time sale over Christmas, but this is still a pretty good deal.  If you want to DIY yourself some bookcases like ours, now is the time to get started!!

I mentioned in an earlier post that the jury was still out as to whether or not it was worth it for us to customize the billy's or if it would have been better to build them ourselves.  In the end, since we ended up doing so much custom work (adding crown, building up the base, cutting part of one shelving unit down so that it would fit around the bumped out wall, adding an end panel to the one side, replacing the backing with beadboard... whew!) Doug felt that it would have been easier to do it from scratch.  But, if you're going to do a more simplified built in version, I think it would be worth it, and easy to do!  Wanna a bit more inspiration?  Check some of these ones out.

Painting out the back in a fun color looks awesome.  I wish I was brave enough to try this in my house...


In both of these cases, they just attached the shelves to the wall, trimmed out the top and sides with flat stock and painted it out in a similar shade of white to make it look like one unit, not three.


Both images are from House and Home

Man, these pictures of perfectly styled bookcases make me want to head downstairs and start tinkering with ours... if only I had nice stuff to put on them.

Or... if you didn't want to do an entire wall of built in shelves, you could always pick up one shelf and customize it to make it extra special.  The DIY experts at Young House Love  did it in the office of their old house (see the transformation here).  Isn't this cute?


Here are a few more ideas if you feel like hacking a Billy...


both images from here

If you're looking for a weekend project, I just found one for you.  You're welcome :)  If anyone out there decides to attempt such a project, please send me a picture!!  I would love to see...

Wednesday, January 26, 2011

Now we're looking better...


The work in the office is officially done!  Over the weekend we moved all of our junk back in.  These bookcases are quite the upgrade from what we had in here before!  (see here)  I've spent the last few afternoons in the office staring at the bookcases, moving things around-- basically trying to make our not so attractive books and office stuff look as pretty as possible.  After a bit of shuffling and re-organizing (and hiding the really ugly books and picture albums) it looks alright.


The bead board wainscoting is painted and makes that crazy half-wall looks 10 times better than it did before.


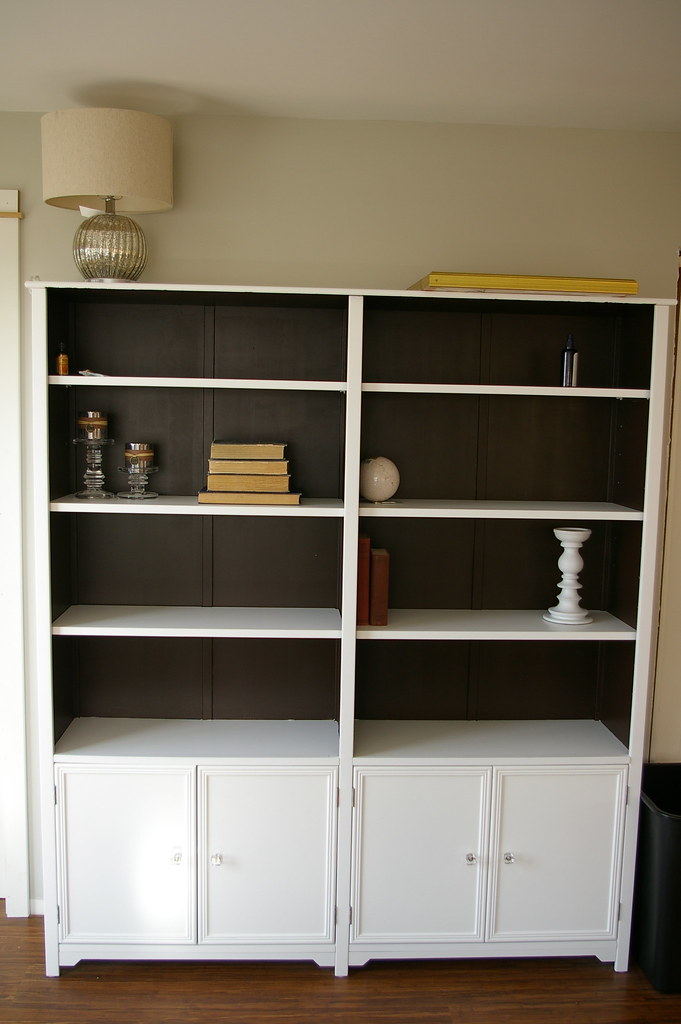
Now let's get up close and personal with those bookcases.

As you can see, Billy got a bit of an upgrade.


The ugliest books of all have been stashed in the baskets.  Sometimes I wonder why I don't get rid of those old, ugly, outdated, and for the most part useless textbooks.  When I say useless-- I mean today and also 10 years ago.  But then I remember how much money I spent on those crazy books.  That's why they're still on the shelf.


As you can see here, we put three of the Ikea Billy bookcases together and then trimmed them all out in MDF strips cut to size.  Once it was all sanded and painted it looked like one unit-- not three.


And the bead board on the back instead of the cardboard panels looks so much better.  Gotta love the cardboard tri-fold...  good try Ikea.  Good try.


Doug had to customize the last bookcase so that it would fit around the bumped out wall.  He also made a few adjustments that allow us to hide our router and wireless modem on one of the shelves-- I think that's what they're called.  I really have no idea what they do-- all I know is that I'm not supposed to touch them.  What I do know is that I hate the way the look (all those cords and flashing lights drive me crazy) so I'm currently hiding them behind the picture until I can think of a better solution.


And on the other side of the room is my desk!  Finally, it's back where it belongs.  Let me take a minute to tell you about my great deal of a desk (because that's what us ladies like to do-- find great deals and tell everyone we know about them).  I found it in Pier One a couple of years ago-- regularly $699-- but the floor model was on sale for $150.  Why?  Because the drawer front was cracked.  I showed it to Doug, he assured me that it was fixable, so we brought it home!  All it took was a bit of glue, a couple of clamps, and one of those stain pens and the desk looks as good as new.


I have an entire blank wall that needs some sort of artwork.  I have no idea what I'll do with it yet.  In the meantime, I framed one of Caleb's paintings in a frame I found in the clearance bin at Home Sense.  I actually think it looks pretty great.


The far wall also needs some help as you can see.  And I'm on the hunt for the perfect area rug.  That closet is also crying out for an organizational makeover.  Doug, please build me some custom shelves like you did here!


And the window also need some help.  I'm currently working on some curtains that might work-- the built out half wall might make the floor length drapes look funny... if they don't work in the office I'm sure they'll work on some other window.


So, in summary:

Bookcases look good.
I have ugly textbooks.
My desk was cheap.
Caleb in an aspiring artist. At least him Mom thinks so.
Area rug needed.
Too much wall-- not enough art.
Please Doug, help the closet!!
And curtains, what to do...

Thursday, January 13, 2011

Our Current Project

I think this is the first time I've done a post on an in-progress project!  I guess it's because I've been playing catch up for the last few months.  Well, Doug and I decided to tackle the office.  Our office is located downstairs-- it's the first downstairs room we've tackled.  This project has got to be one of the longest most drawn out project we've ever attempted.  We tore the office apart after Emerson was born and once Doug was back at work, but with two kids and busy schedules-- things tend to move a little slower.  But finally, the office is in its last stages!  I thought I'd share it with you all.

Like most people, we have lots of books and stuff that needs a spot (boxes in storage doesn't count!)  So, we decided to put in some custom bookcases.  Here they are-- in the priming/filling/sanding stages.


We put in new laminate (had a few extra boxes leftover from the upstairs reno) and installed new mouldings.


There is this awful bumped out half wall along two sides of the office that are terribly uneven.  To disguise the fact that it is really out of square we decided to cover it in bead board and cap it off with a built out ledge.  I think it's going to look awesome once it's all painted.  The half wall no longer sticks out like a sore thumb!


Here's the "before" shot.  Please excuse the blurry picture quality-- I can't blame this terrible picture on Caleb, I totally took this one myself.  The green isn't a bad color-- it just made the room feel pretty dark.  As you can see, the shelving situation has received a bit of an upgrade. 


Let me tell you,  I am SO anxious to finish up in this room so that I can move all my files back in and get organized.  The state of our files are pretty embarrassing-- especially coming from someone who once was in charge of coming up with a system of converting a entire university's paper admission files into electronic files.  Every time I have to find some sort of document I am absolutely horrified at how disorganized things are downstairs.  Once this office is done-- I will be putting an end to the chaos!

Wanna know a secret?  The built in bookcases are actually from Ikea!  I've seen people convert Ikea's Billy bookcases into built in custom-looking shelves in magazines and online-- so we thought we'd save ourselves some work and give it a try.  


They received a bit of an upgrade-- bead board on the back instead of the flimsy cardboard Ikea sells you with the bookcases, we built up the base, added a substantial header and crown moulding, the one exposed end gable received a customized panel, and we trimmed out all the joints to make it look like one unit, not three.  The jury is still out as to whether or not this was a better option than building the shelves ourselves...

Once the priming and painting is finished, I'll show you how it looks!