Showing posts with label art. Show all posts

Sunday, October 16, 2011

Educational Artwork

I've been looking for something to put up on the wall above Caleb's bed for a while now.  I wanted something unique and one of a kind.  At first I was going to do a gallery wall of his artwork-- but I soon decided that a wall full of metal frames with glass was an accident waiting to happen in this kid's room.  So I did a bit of searching around on Esty and found this.


It's a vintage map of Canada from 1936.


I thought that finding a really old really cool map was going to be difficult, but I found TONS of original old maps of all different varieties-- some over a hundred years old-- for pretty reasonable prices on Etsy.  There were street maps, nautical maps, maps of provinces, countries, territories-- everything.  Very cool stuff.  I knew I wanted to frame mine and I wanted it to be big-- so my choices were a bit limited since I wanted it to fit into the largest Ikea Ribba frame. After a bit of searching and emailing back and forth with a few Etsy sellers I purchased this old Canadian map for $8.00.  Not bad.


It almost fit into the frame perfectly-- it was slightly too big-- so we had to trim it a tiny bit so it would work.  I picked up two big sheets of white poster board and put them together to give the map a neutral backing.  The map isn't perfect-- there are a few tiny holes, rips, marks, creases, and the paper is yellowed-- but I love it.  It has  lots of character :)


I know you're all thinking-- how is this frame any different from a gallery wall of little frames with glass?  It sure looks like one great BIG sheet of glass.  But it's not.  The largest Ikea Ribba frames have clear plastic instead of glass.  It makes them lighter to hang and so much safer with young kids around.  But it totally looks like glass-- totally fooled me :)

And that is the educational artwork we put up in Caleb's room.  Now every time he goes to bed he wants us to tell him ALL about EVERY place in Canada.  Oh boy...

** I found many many more great vintage maps and charts-- if anyone is looking for a cool map-- email me and I'll send you the links to some other great finds **

Friday, September 02, 2011

On Display

I love art created by kids.  I also love gallery art walls.  So, if you combine the two you get something pretty awesome.  Maybe something that looks like this...


Caleb LOVES to do art projects.  He started at an early age-- when he was just a wee lad he would head off to daycare where he would craft away the day.  His love of creating has continued.  I literally have an entire filing cabinet drawer that's full of his creations.  One project that's on my to do list for this fall is to find a way to creatively display some of his stylish work!  I've been collecting some pictures of stylish ways to display kids art.  Here are some of my favorites...

Honestly-- this is so stylish and so pretty-- it's beautiful!  Who needs to buy art when kids can create something like this!


A grid of frames up on the wall like this is pretty incredible-- you could put anything into these frames and it would look amazing.  I LOVE it!


Honestly-- skip the fridge magnets and head for the frames.  I've been collecting a bunch of cheap frames and mats to frame some of Caleb's paintings-- because the frames take it from being cute to stylish!  Stylish enough for the kitchen :)


I think the key is to display kids art in a collection-- putting one or two up won't have the same impact as a grouping of pieces.  In this picture these images aren't framed-- but they are grouped together in an artistic way.  Because the room is more casual it works!


Again, in this space it's the grouping and scale of this arrangement that makes this look so amazing!  All this mom did was attach thin strips of wood to the wall, painted them out and attached clips to the grid so that artwork could be rotated and added to the wall easily.  Brilliant!  (For more details click here)


There are hundreds of creative ways to display kids artwork-- just search on pinterest for a while and you'll be blown away.  Here a few more fav's of mine...

Clip it up!!


Magnetic strips.  Oh my-- I am totally digging that pink strip along the bottom of the wall.  And those little boots, and the little chair-- so cute!


And I would love to try this one out-- if you can't store all of your kid's art just photograph it, shrink the images and display them as a collection in a single frame.  Totally modern-- from a distance it looks like a great print-- and the best thing is that you don't have to keep drawers full of artwork!!


So one of these days (maybe in a few weeks!) I'll have to get Caleb set up to do more painting and figure out where I'm going to display it!  I can't wait!  And if you're looking for a project for the long weekend and have stacks of kids artwork-- here you go.  A weekend project just for you :)

All images can be found here

Wednesday, May 11, 2011

Keep Calm... it's free

I sat down at my computer this afternoon thinking that it would be the perfect (rainy) afternoon to do a bit of blogging... only I had nothing to blog about.  Then I started poking around on Pinterest (if you haven't been on Pinterest yet, beware... it's addicting).  I enjoy looking at all the DIY crafty ideas because, well-- you know me.  Today I discovered this free Keep Calm printable!!


All you have to do is click on the download link, choose the color you like, print out your own totally free 8x10 and throw it into a frame.  Instant cute art.  You too could have something like this hanging in your house...


Only difference is... yours would be free :)  Oh well... I still love the pink Keep Calm in Eme's Grammy Glam room.  How's that for a "don't know what to blog about" kind of post?

Wednesday, April 27, 2011

Another weekend project idea for you... a few days early.

Thought I'd pass along this idea just in case anyone's looking for a fun DIY project this weekend!  This time around I decided to post the idea a few days early-- just in case you need a few days to gather supplies and such.

I saw this do it yourself art on the blog me oh my!  How fun and creative is this?  She has a step by step tutorial on how to create this for your own home.  What I love about this (besides the fact that it looks great) is that you can totally customize the message on the sign-- you can make up your own message or use some great lyrics, a saying, or a verse that's special to you.


In other news, I am currently camera-less... I left it at Toews HQ during family dinner on Sunday night.  If anyone residing at that house (I know there's a lot of you living over there these days!!) are heading to my part of town please feel free to drop it off :)  Until then... I shall have to get creative with this blog of mine!

Tuesday, April 12, 2011

Almost there...

My daughter is almost 8 months old and I'm still decorating her nursery-- I really need to pick up the pace.  Soon she'll grow out of her crib  *tear* and I'll have to start all over again.  Well, I finally got around to putting something up on the bare wall above her change table.  I was stalling on this one, because I wasn't quite sure what to do with it.  Finally I decided to just find things around the house and create a cute little gallery wall.  And here it is... an almost free mini gallery wall for Eme's room...


I know you're all thinking... almost free?  How did you manage to pull that one off?  Well I happen to be a bit of a picture frame junkie.  I don't buy expensive ones... I have a problem with buying cheap ones.  Over the year's I've developed quite the stash.  I find cute little frames at MCC for $2.00 or $3.00 a piece, I find them in the as is section of Ikea... and let me tell you, there's a reason why they're so cheap.  They always need some major care-- sanding, painting, new mattes, new hanging hardware... lots of TLC.  In this arrangement of frames the only one that was purchased for full price was the big one.  I had it sitting around in my stash for a couple of months so it got to make its way into the collection.

Next I had to find some really cheap stuff to put into those frames.  Here's what I found.

To the left... a painting Caleb did during our at home morning art class.  And at the bottom, some super cute butterfly stickers I found at Walmart.  They were seriously 8 for $4.00.  I have a few left over if anyone wants to make their own butterfly art.  The two pictures in the middle are some pictures I had blown up and printed at London Drugs in black and white.


To the right... more butterfly art.  And the hot little pink number is a free printable from here.  I got the idea from 6th Street Design School.  I just downloaded the image and printed it off on my own printer.  The blog has other free images you could use as art for kid's rooms-- just click on the "freebie" label and print until your heart's content!


And now, some lessons learned from the process of creating this gallery wall:

1.  A painting project is NEVER as easy as you think it will be.  It is way harder.  It will take way longer than you anticipate.
2.  Always prime first.  Especially if you're using really cheap "gold" frames.
3.  Never spray paint in sub-zero conditions.  The finish will crackle as it dries.
4.  Oil paint can cover anything and make it look great.  I tried latex paint first.  The finish kept chipping and scratched really easily.  I finally switched to oil paint it finally gave me a nice glossy durable finish.
5.  My husband is a genius with a tape measure.  I never hang pictures in this house because Doug can do it 100 times faster than me and does a way better job.  For this one, he just took a quick glance at the arrangement I had on the floor, asked me where I wanted it on the wall and within a matter of minutes had the wall of frames hung PERFECTLY-- only using his tape measure and some quick math.
6.  Never start to hang a picture wall in your child's room 5 minutes before bedtime.  As fast as Doug is, Emerson was in quite a cranky state by the time we had finished up in her room.
7.  And lastly, never assume that your child will appreciate all the effort you put into her room...


Since I already had the frames this gallery wall was pretty cheap to create.  I paid $4.00 for the butterfly stickers and $7.00 to have the two pictures printed.  Grand total?  $11.00.  Not bad.  I may add more pictures to the wall over time and switch up the art in the frames, but it certainly does the trick for now.

Wednesday, April 06, 2011

A little cheese for you and me...

Confession time... my favorite way to eat cheese is on nachos.  This is also Doug's favorite snack.  Over the past year or two we've gotten into the (bad) habit of eating nachos as an evening snack a couple of times a week :)  Doug makes them the best... I've blessed him to be the official nacho maker in our relationship.

But now as you know, I'm living a dairy free life for my little lady.  At least for now.  That means no more nachos for me.  Sad face.

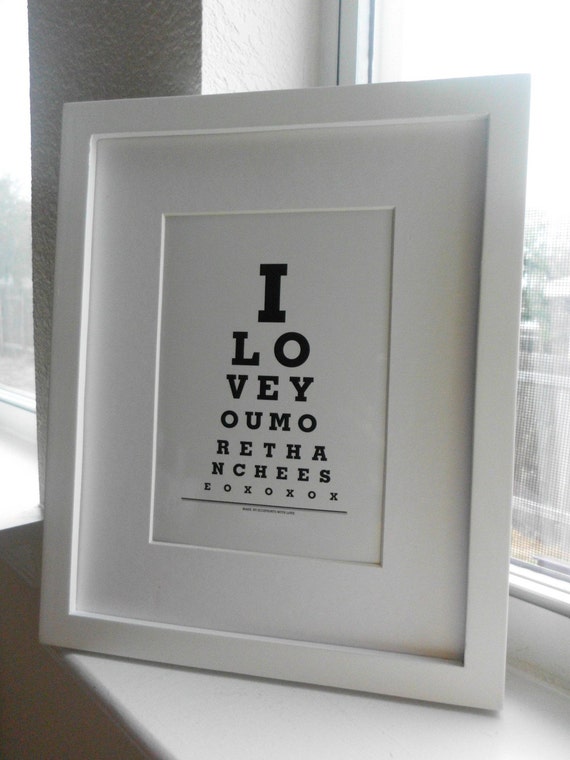
As I was searching etsy for some cute inexpensive artwork I came across this little number.  I am SO tempted to buy it for Eme's room as a reminder of how much her momma does love her :)

(If you can't find your glasses... it says-- I love you more than cheese)

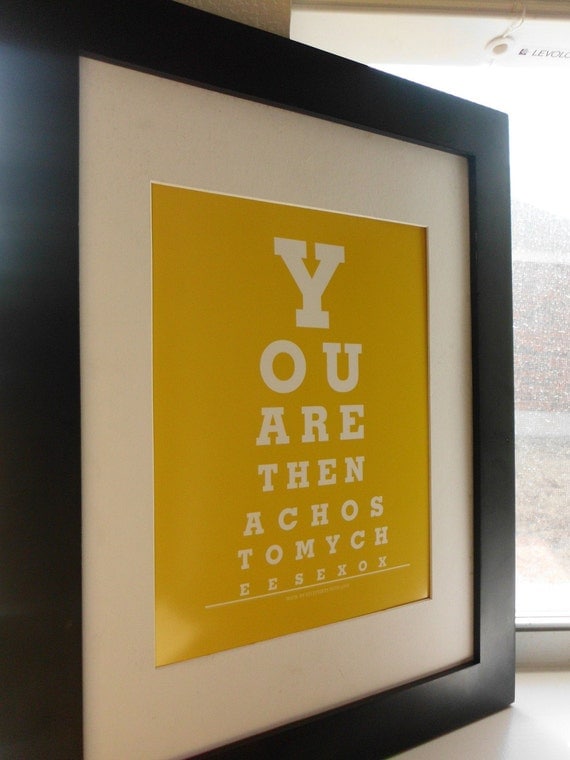
Then I found this one and told Doug that I was going to buy it for him.  "Don't you dare..." was the response I got.

(this one says-- You are the nachos to my cheese)

So there you have it... a little cheese.  These prints come from ecceprints... there are lots of other cute prints that would be fun for a kids room... or maybe your room if you're so inclined.  Go check it out!