Friday, May 13, 2011

Feeling Thrifty

My sister and brother in law came out from the prairies for a visit!  Today my sister and I decided to do a bit of thrift store shopping.  We found some good deals!  Let me show you what I found for Caleb's room today...

First up, this old wooden racquet!  I saw it at Value Village for $6.00 and knew it would be a fun addition to Caleb's room.  He likes anything sporty (especially things that are used for swinging and hitting :) and the racquet fits with the cool Canadian hunting lodge feel inspired by the HBC lookalike blanket I found for him a while back.  It's got this awesome old school Canadian flag on it... I decided to hang it on the wall as a unique kind of artwork.  I'm also hoping to keep it out of reach-- until he pulls out the step-like shelving unit in his closet and pulls it off the wall :)


And the next deal of the day... this old school globe from MCC for $2.50.  It's definitely not geographically accurate anymore, but Caleb loves it!  I also think it looks pretty amazing... and for $2.50... it's a steal!


And last but not least... I found this light fixture at MCC for $2.50!  If you've read my post on light fixtures you would understand why I'd be excited about this one.  It's not big enough or bright enough for the dining room... but I think it could work in another room in the house.  Maybe I'll try to put it in Caleb's room... or maybe I'll use it to replace one of the many boob lights in my house-- I already showed you the ones in the hallway, but there are unfortunately more in the basement!


If anyone could use a few new things for their room... it's Caleb.  He's had a pretty rough day today.


Don't you just hate it when you scrape your face on the driveway?

Wednesday, May 11, 2011

Keep Calm... it's free

I sat down at my computer this afternoon thinking that it would be the perfect (rainy) afternoon to do a bit of blogging... only I had nothing to blog about.  Then I started poking around on Pinterest (if you haven't been on Pinterest yet, beware... it's addicting).  I enjoy looking at all the DIY crafty ideas because, well-- you know me.  Today I discovered this free Keep Calm printable!!


All you have to do is click on the download link, choose the color you like, print out your own totally free 8x10 and throw it into a frame.  Instant cute art.  You too could have something like this hanging in your house...


Only difference is... yours would be free :)  Oh well... I still love the pink Keep Calm in Eme's Grammy Glam room.  How's that for a "don't know what to blog about" kind of post?

Tuesday, May 10, 2011

Another Closet Conquered

Operation "No Closet Left Untouched" continues to sweep through this house.  Next up on my list... Caleb closet.  His closet "before" wasn't messy, disorganized, or cluttered... it was pretty much empty.  So this time around I didn't need to do any sorting, purging, and organizing.  Instead I needed to put stuff in it!   I wanted to make Caleb's closet into a space where he could store and organize his toys in a fun, creative, and inviting way.  As the little lady of the house starts to move around I wanted to have a safe zone for Caleb to keep his lego, puzzles, cars, and playmobil.  In the next months it's so important to keep all the little stuff out of Emerson's reach... but I also didn't want Caleb to feel like his toys were off limits.  With that in mind, I decided to turn his closet into toy central for Caleb!  The process started a few weeks ago when I purchased this toy storage unit off of craigslist for $20.  It desperately needed some paint and a little loving.  All it took was some primer and white paint I already had in the garage to turn it into a cute toy storage unit for Caleb's toys.


When we showed Caleb his new toy storage system he was SO excited!  He ran all around the house grabbing his favorite toys and began to fill the drawers.  I decided to display some of his artwork in the closet-- it makes it look more fun.  He has created so many crafts and pictures over the past months-- and I can't keep them all.  Every piece of art he creates is displayed on the fridge for an appropriate amount of time, some are then tossed *gasp*, but the cutest ones are kept for his room.


There is one unfortunate drawback to this particular toy storage unit.  Can you guess what it is?  Well... let's just say that I like to use the top shelf of Caleb's closet to store things that are best kept out of his reach (ex.  annoying toys such as whistles and recorders and super messy craft supplies).  But it didn't take Caleb long to realize that his new storage unit had a bonus feature-- a built in step system that allows him to reach the top shelf very effectively :)  Time to find a new hiding place!!

Monday, May 09, 2011

Best Job Ever


I am so blessed to be Caleb and Emerson's Mom.
I am also so blessed to have two wonderful Moms!  Love you both.

Yesterday was a wonderful day... I got to sleep in... was woken up by two sweet little kiddos who had made me a card... I didn't have to make lunch OR dinner... and was treated to an afternoon of shopping.  How's that for a great mother's day?!  In my books?  Perfect :)

Saturday, May 07, 2011

For a Growing Family


I came across this awesome idea this week...  making a super stylish growth chart!  I love the idea of having a spot in the house where you mark the heights of your kids over time.  Instead of marking up the walls (could be problematic when/if you sell your house!) why not make this amazingly stylish ruler inspired growth chart that you could display in your house!  The best thing is... it can travel with you and the family if you ever move.  I love it.  Check out the step by step tutorial on how to make your own growth chart here.

Friday, May 06, 2011

Mommy Jam

Last weekend I made jam.  Homemade strawberry rhubarb jam.  Just call me Martha... or Jan.  Because Jan is pretty much a Martha.  It all started when I saw this recipe for Strawberry Rhubarb Jam on Mennonite Girls Can Cook.  Rhubarb grows in my yard like a weed.  Some may even argue (my father in law for example) that rhubarb is in fact a weed.  But Caleb likes to chew on it as he's playing in the backyard and he also likes jam... so I figured that making jam out of rhubarb sounded like a interesting experiment to try out at our house.  One afternoon I sent the boys out to the backyard with both Doug-sized and Caleb-sized scissors.  They came back with this.


Once I had the rhubarb sitting on my kitchen counter I decided that the I couldn't use the MGCC recipe... because it didn't actually include any strawberries.  For some reason the thought of consuming jam that was made with only rhubarb was not too appealing... it just looked too "weed-like" sitting there in my kitchen.  So I used the recipe from the certa package.  This was my first jam-making experience-- for some reason I've always thought it was above my level of expertise.  But apparently it wasn't... because it was easy.  And it's delicious... rhubarb and all :)


Caleb agrees.


Jam may not be the healthiest option for my child to consume-- it's pretty much a bit of fruit and a whole lot of sugar.   But I figured my homemade jam is probably better than this:


One night in Superstore (I was alone) I made a big mistake.  I saw this squeeze-able strawberry jam and started to laugh.  Full on laughter there in the aisle of Superstore... all by myself.  Why?  Because I knew how much the boys in my house would love it.  LOVE it.  And love it they did.  Now I can't go to Superstore without Caleb yelling "don't forget the squeezy jam!!!!" over and over again. 

Really, I can't blame Caleb.  Squeezing jam onto your toast is remarkably satisfying and fun.  And the combo of almond butter and "squeezy" jam is quite amazing.

But hopefully the strawberry rhubarb jam, or "mommy jam" as Caleb now calls it... will satisfy for now... Cause we've got a whole lot if it :)

Wednesday, May 04, 2011

We need to work on our zoo terminology

Doug randomly finished work early today.  It was one of those beautiful days that must be spent outside.


We decided to wake the kids up from their naps early and take them to the zoo.  We had so much fun.  It was Emerson's first time-- as you can imagine, she was pretty pumped to spend the afternoon at the zoo.


Awww... she really didn't mind waking up from her nap early.  We actually didn't hear a peep out of her for most of the trip.  And she did perk up when we brought her out of the stroller to see the cheetah with her brother.


It may not be the most amazing zoo... but the grounds are BEAUTIFUL.  I couldn't help but snap a few non-animal pics.


Doug found it quite hilarious that I was taking pictures of non-animal things.  Thus he decided to take a picture of me taking pictures of non-animal things.  Yeah, we were a bit camera happy.  But I can't help it... my phone made me do it!


After spending some time strolling around looking at the animals it became apparent to Doug and I that Caleb's animal recognition skills could use a bit of fine tuning.  This was somewhat disconcerting for Doug. (Doug happens to be a fan of animals of all kinds.  Even reptiles.  I may or may not have had a minor panic attack in the reptile house).

Case in point.

Doug points to the warthogs..."What are those Caleb?"  Buffalo... he says.


Later on... I point to a moose.  Caleb is happy to inform me that it's a rabbit.  Ahhhhh, what?


And apparently it's not pronounced "cattle"... it's "cathol".  (emphasis on the "th" sound)


We see one of the zoo workers drive by in a Kubota vehicle.  In absolute AMAZEMENT he points and says to me... "wow Mom, you don't see one of those everyday!!!"  I have a cow (or should I say cathol) laughing... we're at the zoo buddy... there are hundreds of amazing animals here that you don't see everyday-- and yet the transport vehicle manages to wow you more than anything else.

Oh well.  Improper terminology and misdirected enthusiasm aside, we still had fun.  At least I did.

Tuesday, May 03, 2011

DIY: Make your own fitted crib sheet


A while back I shared a project I finished up for Eme's room... remember operation granny glam?  Well I've had a few people ask how I made the fitted crib sheet for her room.  Instead of ineffectively attempting to describe the process in 100 word or less, drawing random diagrams on useless scraps of paper, and totally confusing many of my friends... I thought I'd do up another little tutorial for you all!

This project was born out of desperation.  After months of searching high and low for a cute crib sheet... and I mean really cute... I couldn't find anything I loved.  When that happens, I start to turn into my mom and say to myself... I can totally make it myself!  A total "Jan" moment.  As I mentioned before, I found a twin sheet set at Zellers in an awesome bold granny-ish floral pattern.  It's so fun.  I plan to use the pillow case and full size fitted sheet on her bed one day when she grows up, but I'm not really a fan of flat sheets for kids beds.  Instead of letting it go to waste... why not make something out of it?

Here's what you'll need to sew your own fitted crib sheet:
  • fabric suitable for a sheet-- I had lots of leftover material after using the twin sized flat sheet (enough to make up a few throw pillows with the scraps) or two-ish yards of fabric (exact amounts will be determined by the size of your crib mattress)
  • 5 feet of 3/8" elastic
  • A large safety pin
  • A sewing machine (obviously)
Now... what to do:

Step 1-- measure before you cut.

Most mattresses will be the same width and length... they may differ slightly in height.  It's time to pull out your tape measure (if you're at our house... pull out one of our many tape measures... we practically have one in every drawer) and figure out the dimensions of your mattress.

These were my measurements:
 width-- 28"
 length-- 52"
 height-- 5"

Step 2-- calculate.

Now that you have the measurements, it's time to figure out how big to cut the rectangle you'll need to construct the sheet!  Here's how to figure out the dimensions of the rectangle you'll need to cut...

Width of rectangle= width + height (x2) + 6 inches for seam allowance (you'll need about 3" per side)
Length of rectangle= length + height (x2) + 6 inches for seam allowance

Check out those mad math skills!  As my sister would say... I'm not as dumb as I look (love you Trish :)

So that means my rectangle needed to be 44" wide by 68" long.  Because I was cutting up a ready made sheet... I didn't need to worry about having enough material.  But if you plan on purchasing new fabric to make up your crib sheet you'll have to make sure the fabric will be WIDE enough.  Most quilting fabric comes 44" wide-- this would have worked for my mattress, but if yours is higher than mine you could run into trouble.  I would recommend using fabric that comes extra wide or cutting down a ready made sheet for your project.  If the width is close (like an inch close) you should still be okay.  I might incorporate a bit of the salvage edge into my rectangle to make it go a bit further.

Step 3-- cut it out!

Once you've cut out the rectangle, you'll need to cut a square out of each corner to turn your flat rectangle into a box with sides that fit your mattress!

The size of the box will once again depend on the height of your mattress.  Here's how to figure out the size:

Height of mattress + half of seam allowance-- this means that the size of my box was 5" + 3" = 8"

Now, cut a square out of each of the four corners of your rectangle.  When you're finished, your fabric should look something like this:


If it doesn't look like this... whoops.  Either you did something wrong or I'm a terrible tutor :)

Step 4-- sew your corners!


Fold together the two sides of the each corner's square-- right sides together.  If you have a serger (lucky you!) serge the sides together.  If you don't, stitch the sides together leaving a 3/8" seam allowance and then zig zag the crap out of the edge to prevent it from fraying or coming apart.  Once you've stitched together each corner you should have a box that will fit over the mattress!

Step 5-- hem it

Sheets often only have elastic at the corners-- I prefer the ones that have elastic all the way around the bottom so that it's a nice snug fit on the mattress!  If you like sleeping on wrinkly bunchy sheets (gross!)... don't follow my advice.  If you like sheets that stay put... read on :)

To add the elastic to the bottom of the sheet, I just make a slightly wider hem and insert the elastic.  To do this, you'll need to start by pulling out your iron.  Turn the edge under a 1/4" and iron it for a nice crisp edge.  Then turn the edge under a second time-- this time 1/2"-- and iron again (turning the edge under twice hides your raw edge-- no fraying allowed!!).  Then start stitching the turned under hem all the way around the bottom of the sheet.  Make sure your line of stitching is closer to the top than the bottom (see picture below) so that you're stitching through all layers of fabric.  This will hold the raw edge under and give you a nice wide case for the elastic.  Make sure you don't stitch ALL the way around... leave an open space to insert the elastic.


Step 6-- Elastic

It's time to make it stretchy.  I used 5' of elastic for my sheet.  I feel like it worked well-- like a glove baby.  To put the elastic in, attach the safety pin to one end of the elastic.  Then start pushing it through the hem you created around the perimeter of the sheet.  The bigger the pin-- the easier the task.  Once you have fished the elastic around the sheet, sew both ends together well-- you don't want it to come apart.  Then stitch up the remaining few inches of the hem and you're done!!

Clear as mud?  Probably :)  If anyone has any question, let me know!  I may or may not be able to help you.  And if you attempt this project-- let me know how it goes!!

Sunday, May 01, 2011

Taking it to the next level...

My friend Erica decided to make some roman shades for her mudroom... and guess who's tutorial she used?  Erica really took it to the next level however, because she didn't make just one shade... she made FIVE shades for her mudroom!!  They look amazing...


I have some serious mudroom envy going on right now...


Great job Erica!  Check out her blog for more details.  Like I've mentioned before, if anyone decides to try their hand at making one of these shades-- send me a picture and let me know how it turned out!  You can email me at elissa.toews@gmail.com.  And... if anyone has a really awesome project that you've come up with and want to share-- send it my way!  I always love a good project :)

Saturday, April 30, 2011

Easter Weekend

My camera is now back in my possession (thanks Jamie!!)  Time to rewind... let me share a couple of pictures from Easter weekend, because I know the grandmas, grandpas, aunties, and uncles would like to see a few new pics of the kids.

First highlight of the weekend-- Doug ran out to Home Depot while Caleb was napping during the afternoon and picked up some rope to make a tree swing for the backyard.   It's taken a while for Caleb to get the hang of it, but the swing is proving to be a big hit.


I had to try it out too... of course.


Second highlight-- Easter egg hunt at Grandma's house..


Cousins... now everyone sit still for the picture... all look the same direction... and smile.  Yeah right.


Something tells me they're way too distracted by the treats in their baskets.


Look up here!!


And here Caleb it telling Eme to keep her hands to herself... as politely as possible.  Of course.


One day sweetie, you will get to have treats of your own.

Thursday, April 28, 2011

Light Show

Maybe you've noticed... maybe not... but when I take pictures around the house I try my best to make sure the light fixtures are not included in the photo.  Why?  Because we haven't gotten around to replacing any of the original light fixtures.  The original ones-- for the most part-- are pretty uninspiring.

However!  After cleaning out my closet a few weeks ago (and selling a bunch of old clothes on craigslist) I had $100 burning a hole in my pocket!  I decided it was time.  Time to put a light fixture in our room that I love.  And love it I do!!


Ummm... yeah, so I still don't have my camera... hence the iphone photos.
Aren't they pretty though?


Now... I know you're all wondering... what could possibly have been there before that was so offensive?
This.


I've said it before... sometimes aesthetics are more important to me than practicality.  A ceiling fan is a completely practical choice for a bedroom that gets stifling hot in the summer (all 6 weeks of it).  But what if that ceiling fan is NOT aesthetically pleasing and is NOT practical?  Unfortunately this fan is not only ugly to look it, it also doesn't work.  I've tried to use it during the hottest of hot days for the past 2 years but the fan just does not move any air in the room, and when it really starts to go fast it starts to shake and rattle like you wouldn't believe.  I used to lie awake in bed at night listening to it get all wound up fearing decapitation.  So, I am not sad to see the fan go.  for the 46 cold weeks of the year I will enjoy the beauty of my new light fixture, and for the remaining 6 hot weeks of the year I will sleep in my cool, quiet, decapitating fan-free basement guest room.

While I'm at it... why don't take you on a light fixture tour of the rest of the house?

First up, the hallway.  I've got a PAIR of these staring at me everyday.  So offensive.  So inappropriate.  Enough said.


Would you believe me if I told you that I've actually paid money... real money... for a light fixture that looks identical to this one in Caleb's room?  Doug and I had a light fixture like this one in the bedroom of a basement suite Doug and I rented a long time ago.  For some reason, when Doug makes the bed he likes to give the sheets a good snap when he shakes them into place.  One morning he snapped those sheets like never before and snapped the light fixture into two pieces.  So off we went to Home Depot for a replacement.  So sad.


This one's in the entryway of our house.  Doug and I have quite different feelings about this fixture.  When Doug looks at it he thinks "now there's a perfectly sensible light fixture that does an adequate job of lighting our entryway."  When I look at it I think, "now there is an unattractive fixture that looks like it it came straight from the torture chamber of a medieval castle."  I don't know why but it just gives me that vibe.  I don't think Doug's going to let me change it anytime soon.  Maybe if I find the most amazing light fixture for an amazing price... like $5.00... he'll go for it :)


And finally, the dining room.  I really have nothing against this one.  It's semi-attractive, it's does a great job of lighting the room... most people would like it.  I guess it just doesn't give me that feeling of WOW!  It's not a WOW kind of light fixture.  I want WOW when I sit in my dining room eating hot dogs as my kids throw food on the floor, gag, and then throw up their dinner.


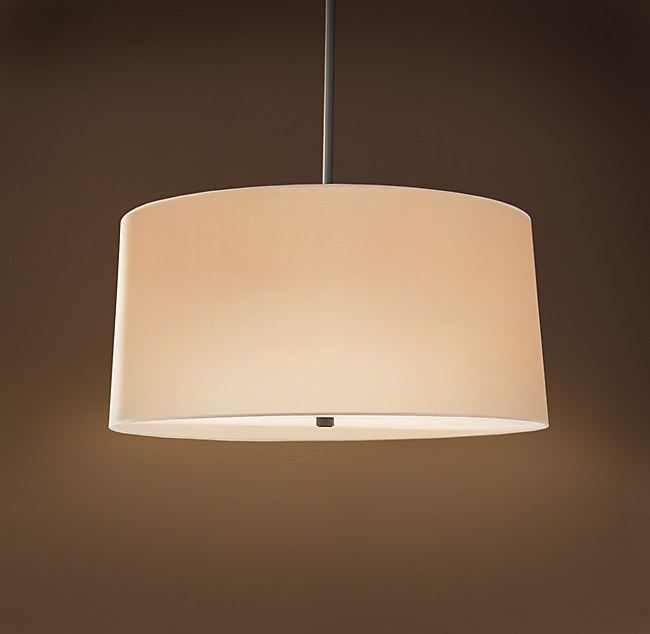
What I really want is something like this from Restoration Hardware.  I think that the worst of dinners could be made better by a light fixture like this one.


Only problem is, I don't have an extra $500 in my budget for the RH light fixture.  Shocking... I know.  If anyone knows of a light fixture that looks like this but is a MAJOR deal, please let me know!  And if anyone would like the purchase any of my pre-existing light fixtures, please... let me know :)

But if you had your eye on the decapitating ceiling fan, your sadly out of luck.  It's already found a new home at the dump.

Wednesday, April 27, 2011

Another weekend project idea for you... a few days early.

Thought I'd pass along this idea just in case anyone's looking for a fun DIY project this weekend!  This time around I decided to post the idea a few days early-- just in case you need a few days to gather supplies and such.

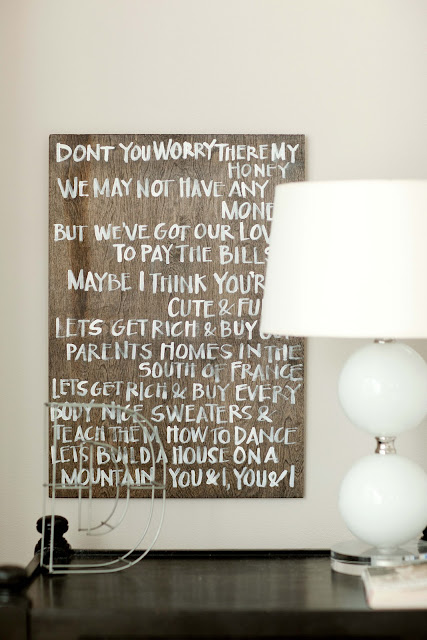
I saw this do it yourself art on the blog me oh my!  How fun and creative is this?  She has a step by step tutorial on how to create this for your own home.  What I love about this (besides the fact that it looks great) is that you can totally customize the message on the sign-- you can make up your own message or use some great lyrics, a saying, or a verse that's special to you.


In other news, I am currently camera-less... I left it at Toews HQ during family dinner on Sunday night.  If anyone residing at that house (I know there's a lot of you living over there these days!!) are heading to my part of town please feel free to drop it off :)  Until then... I shall have to get creative with this blog of mine!

Tuesday, April 26, 2011

Going all Granola...


So I was shopping for groceries yesterday (bet you can't guess where) and found myself in the cereal aisle.  I've never been a big cereal eater... but lately I've found that it's the easiest way for me to enjoy my  new substitute for milk-- almond milk.  So I'm looking for a yummy cereal option and reading the list of ingredients of every box (a new habit for me) and am starting to feel concerned at first of all... how many ingredients there are in a box of cereal and secondly... that I don't have a clue what half the ingredients are!  I left the aisle empty handed and resolved to make my own granola.  I grabbed a few bags of nuts (not peanuts) and other items that I thought might work in homemade granola and headed home.  I really don't know why I don't make homemade granola more often... it's so good!  This morning I whipped up a batch while the kids were running around the house, toys flying everywhere. I used this recipe.  It's easy.  It's delicious... especially with almond milk.  And... now that I have homemade granola, I think I'm going to have to try making homemade granola bars too :)

Friday, April 22, 2011

Making a Headboard


I've been sleeping well lately... enjoying my new headboard :)  This week Doug finished making the legs and late one night (it was actually that day... the one with the hotdogs and the hockey game) that I heard the sound of power tools coming from the basement.  Doug was putting the finishing touches on the frame so we could move it upstairs.  I just love our late night projects :)


Our inspiration was the Colette bed from Crate & Barrel.  I love the way it looks, but not the price tag.  Seriously. If I had an extra 2 g's kicking around I'd renovate my kitchen... not buy a bed.  I knew we could make a lookalike for quite a bit less.  So I showed the picture to Doug and asked if he could build the frame for me... he was up for the challenge.  A couple of weekends ago Doug and I worked into the wee hours of the night to upholster the headboard.  We had fun.  At one point Doug may or may not have asked me to shoot him with the stapler.  Apparently he wanted to know what it felt like.  But as he was standing all the way across the garage facing the wall waiting for the blow he decided that he really didn't need to know.  Even though it was late and we were acting way too immature, we still managed to get er done.  I think it turned out great!

Here are some of the details.  I decided to go for a warm grayish sand colored linen.  I like the texture and warmth that it brings to the room.  My pictures really don't do the color justice-- the lighting situation in there is terrible (it's currently exposed hanging wires from where to old ugly fan used to be-- another story for another day) and really, I'm not an expert photographer :)  Our old Ikea Hemnes had served us well for many years (and will continue to work in the guest room)... but I like the way that our room is beginning to move away from being all matchy-matchy.  Nowadays it's all about mixing it up!!


We used nailhead trim in a brushed gold to define and outline the edge.  I'm really liking the way it highlights the curve of the headboard.


Now that it's done I can happily say that DIY-ing your own headboard is a much better deal than purchasing a ready made one for $2000 (duh).  Here's the breakdown of the costs:
  • lumber to build frame-- free-- Doug used some scraps from the garage
  • 3/8" sheet of plywood to cover the surface-- $13.50
  • 1/2" foam-- got on a 50% off sale at Fabricland-- 4 meters at $3.50 a meter
  • batting-- $10.00
  • inexpensive fabric to line headboard before upholstering with the more expensive linen-- 2 meters at $3.50 per meter
  • linen-- 2 yards at $20.00 a yard-- purchased at Fabricana
  • nailhead trim kit-- $20.00
  • lumber, stain, and hardware to build and attach legs to bed-- free-- it was already in the garage
Grand total?  $104.50.  I like this price tag a whole lot better than the $2000 one.

That's all I have for now!  Hope everyone has a great Easter weekend.  I plan to spend the weekend reflecting on the importance of Easter to me-- the cross, the resurrection, and God's goodness.  I also plan to spend some time outside in the yard (come on sun!!), maybe have an Easter egg hunt or two, and I'm definitely going to have lots of quality time with these three...


I know you're all thinking-- how did I get Caleb to sit still for the camera?


Easy.  Bribery.